Sunday, 30 December 2012

Chicken Dum Biryani

Hi Friends,
 Biryani is made up of whole spices and rice. We can do variations in it by adding chicken, mutton, fish or vegetables.

Making it in a deep vessel or Handi, placing the lid and sealing the edge of the lid with wheat dough, cooking it on very low flame. This whole procedure of cooking is know as DUM PUKHT.

Today I am sharing my recipe with you all, hope you will like it :-)


Ingredients:

  • 1/2 kg chicken 
  • 1/2 cup yogurt (well beaten)
  • 3 large onions (finely sliced)
  • 4 large tomatoes (finely chopped)
  • 2 tbsp ginger-garlic paste
  • 1/2 cup yogurt
  • 1/2 cup fresh coriander leaves (finely chopped)
  • 1/2 cup mint leaves (finely chopped)
  • 2-3 green chilies (finely chopped)
  • 1" cinnamon stick
  • 1 bay leaf 
  • 4-5 green cardamom seeds 
  • 4-5 cloves 
  • 1/2 tsp turmeric powder
  • 1/4 tsp red chilly powder
  • 1/2 tbsp coriander powder
  • 1/2 tbsp garam masala
  • Salt acc.to taste
  • 1 packet of chicken biryani masala
  • 1 tsp lime juice 


  • 1 glass of Basmati Rice
  • 2 tbsp ghee
  • Few strands of kesar (Saffron) (Dissolved in 1/2 cup of Lukewarm milk)


Method:

  1. Cook basmati rice in lots of water ( 1 glass of rice: 3 glasses of water), till its half cooked. Strain the water and spread the rice on a large tray. Allow them to cool.
  2. Now take a kadhai, heat oil in it. Add 1/4 portion of sliced onions and saute it till caramelised. Remove from kadhai and keep them aside.
  3. In same kadhai add cinnamon, cloves, bay leaf, green cardamoms. Saute for few seconds.
  4. Now add sliced onions, saute till they become golden brown in colour.
  5. Add chopped tomatoes, cook till oil separates.
  6. Add yogurt and again cook till oil separates.
  7. Now add all the dry masalas. Mix well. Add chicken pieces. Cook chicken on high flame for 5-10 mins then on low flame for 15-20 mins.
  8. Remove chicken from flame till its 3/4 cooked. 
  9. Sprinkle lime juice and mix well.

How to assemble:
  • Take a handi or any deep vessel, Pour 2 tbsp of ghee in it.
  • Put half portion of chicken. Followed by half portion of rice.
  • Add caramelised onions over the rice, followed by saffron milk and chopped coriander/ mint leaves.
  • Repeat the procedure again.
  • Place the lid and seal the edge of the vessel with wheat dough. Place the vessel on tawa/griddle on low flame for 15-20 mins. ( This procedure is called as DUM)
  • Remove from fire. Remove the lid just before serving.
  • Serve hot with your choice of raita or curry.

Friday, 28 December 2012

Stuffed Bell Peppers

Hi Friends,
 Back to the blogging world after a break..........Today's recipe is stuffed bell peppers. I love the recipe and make them quite often.

I love to give my special touch by adding cashews and raisins, that makes a huge difference in the recipe. So wanted to share my recipe with you all, hope you all will like it.......................


Ingredients:
5 bell peppers
5 medium size boiled and mashed potatoes
1 medium size onion (finely chopped)
1 tbsp cashew nuts
1 tbsp raisins
1/4 tsp mustard seeds
1/2 turmeric powder
Salt acc.to taste
1/2 tsp coriander powder
1/2 tsp garam masala
1/4 tsp dry mango powder (amchoor)
2 tbsp oil

Method:

  • Heat oil in a non-stick pan, add mustard seeds.
  • Add onions and saute till they become golden pink in colour.

  • Add raisins and cashews. Mix well.
  • Add all the dry masalas. Mix nicely.
  • Add mashed potatoes, saute for 5-7 mins.

  • Remove the mixture from the fire.
  • Divide the mixture in 5 equal portions.
  • Now fill bell peppers with potato mixture.

  • Heat little oil in the same non-stick pan, place all the bell peppers on the pan.

  • Cook the bell peppers on low flame.
  • Check that bell peppers are cooked evenly from all the side.
  • You can cook them in microwave too.
  • Remove from fire and serve hot with chapatis.


Sending this recipe to:

        Siri's Blog                                                    Ramya's Blog
                                                

      Viya's Blog                                                    Pari's Blog
                                                 only side dishes

Thursday, 20 December 2012

Stuffed Bread Pakora with a twist

Hi Friends .....
Bread Pakora yummy and favorite snack of all age group.
Have it in breakfast or with a cup of tea.....Normally we make bread pakora with chickpea flour but this time I tried in a different style....Using yellow moong dal batter.
I hope you all will like the way I made it !!!


Ingredients:
4 bread slices 
1 cup yellow moong dal 
Red chilly powder
Salt
Oil for frying
For stuffing:
4 boiled and mashed potatoes
1 onion (chopped)
Few garlic cloves (finely chopped)
2 green chilies (finely chopped)
Salt acc.to taste
1/4 tsp garam masala

Method:

To make pakora batter:
  • Wash and clean dal, keep it for 2-3 hrs in required amount of water.
  • Grind the dal into smooth paste.( It should not be too thick or too watery)
  • Mix red chilly powder, salt and keep the batter aside.

To prepare stuffing:
  • Heat 2 tbsp oil in non-stick pan.
  • Add garlic, saute for few seconds.
  • Add onions and saute till they become golden pink in colour.
  • Add salt and garam masala. Mix well.
  • Add mashed potatoes and mix nicely. 
  • Cook on low flame fro 5-7 mins.
  • Remove from fire and keep the mixture aside.

Now the final step:
  • Heat oil in a kadhai.
  • In the meanwhile cut bread slices into triangle shape.
  • Spread the potato filling on one slice and cover it with another slice.
  • Now dip stuffed bread slices in the dal batter, check that batter is well coated from all the sides.
  • Drop one portion in hot oil. Fry from all the sides till it becomes golden brown in colour. (First I did shallow frying then I observed that the pakora was not fully cooked from all the sides then I switched my cooking method to deep frying)

  • Serve hot with pudina chutney or tomato ketchup.

Sending this recipe to:

      Ramya's Blog                                            Divya's Blog/Priya's Blog
                                                      Events Running At This Space

 
     Viya's Blog                                                             Siri's Blog
Event for month of December                                                    


Monday, 10 December 2012

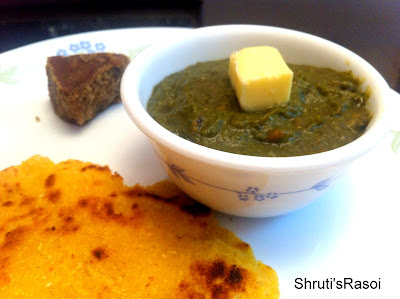
Sarson Da Saag And Makki Di Roti

Hi Friends:
Visited Delhi and not having SARSON DA SAAG not possible. Its a very common dish of North India. Sarson leaves are also know as mustard leaves, basically available during winters.
Sarson da saag is normally serve with makki di roti, topped with butter.......... YUM YUM.
I learnt this recipe from my mother, she is expert in cooking. Love you mom !!!


Ingredients:
For Saag:

  • 1 bunch sarson (mustard leaves) (roughly chopped)
  • 1 bunch spinach (palak) (roughly chopped)
  • 1/2 radish (roughly chopped)
  • 1 carrot (roughly chopped)
  • 1 onion (roughly chopped)
  • 1" grated ginger (roughly chopped)
  • 3-4 cloves of garlic (roughly chopped)
  • 2-3 green chillies (roughly chopped)
  • 2-3 tbsp Wheat flour / Maize flour

For Tadka / Tempering:

  • 2 tbsp ghee
  • 1 tbsp ginger-garlic paste
  • 2 medium size onion (roughly chopped)
  • 3 medium size tomatoes (roughly chopped)
  • Salt acc.to taste
  • 1/2 tbsp garam masala
  • 1/2 tbsp coriander powder


Method:

  • Put all the ingredeints of saag in the pressure cooker with little water.
  • Keep on the high flame till 2 whistles then on the low flame for 5-10 mins.
  • Remove from fire, open the lid once the pressure drops.
  • Once it cools down, grind it into coarse mixture.
  • Mix wheat flour/ maize flour in the saag mixture and keep it aside.


For Tadka/ tempering:

  • Heat ghee in a pan.
  • Add ginger-garlic paste, saute for 3-4 mins.
  • Add chopped onions. Saute till they become golden brown in colour.

  • Add tomatoes, mix well and cook till oil separates.

  • Add all the dry masalas.
  • Add the saag mixture and mix nicely.

  • Keep it on low flame for 10-15 mins. Till saag is nicely cooked.
  • Now your saag is ready to serve with Makki Ki Roti.


For Makki Ki Roti


Ingredients:
2 cups maize flour (makki ka atta)
1 radish (grated)
1/2 tbsp salt
Hot water to knead the flour.

Method:

  • Put grated radish, salt and flour in a large bowl.

  • Add hot water. Mix with the help of spoon. 

  • Once the water becomes warm then  knead with your hands for a few minutes.
  • Divide into equal portions. 
  • Roll them lightly to make chapati. I use an empty milk pouch to make roti.( Tear the milk pouch from three sides leaving one side untouched, place the dough in between the pouch and then press it lightly with your hands. Don't use rolling pin)

  • Cook on medium heat on a tava, keep applying ghee or oil in between. 
  • Cook evenly from both the sides.

  • Remove from fire and serve hot.


For serving: Take SARSON KA SAAG in a bowl topped with butter and serve along with MAKKI KI ROTI.......................


Sending this recipe to:

      Ramya's Blog                                           Priya's Blog / Divya's Blog


          Siri's Blog                                                    Viya's Blog    


Thursday, 6 December 2012

Soya Malai Chaap (vegetarian chicken)

Hi Friends ..
This is one of my favourite recipe which I make whenever I am in Delhi ......We don't get these soya chaaps in Bangalore. I really wish that these should be available in Bangalore too.
Soya is rich in protein and good for growing kids. I made these chaaps and my son ate them thinking of having chicken for dinner.


Ingredients:

  • 500 gms Soya Chaap (around 12 pieces)
  • 2 medium size onion (fine paste)
  • 4 large tomatoes (pureed)
  • 1/2 tbsp ginger-garlic paste
  • 1/4 cup beaten curd
  • 1/2 cup cream or malai (well beaten)
  • 1-2 green cardamoms
  • 1"stick of cinnamon
  • 2-3 cloves
  • Salt acc.to taste
  • 1/2 tsp garam masala
  • 1/2 tsp cumin powder
  • 1/2 tsp coriander powder
  • 1/4 tsp red chilly powder
  • 1/2 tsp kitchen king powder/ chicken powder
  • Oil
Method:

  • Wash the chaaps nicely under the running water. Keep them aside.
  • Make small slits on the chaaps with the help of knife.
  • Heat 2 tbsp of oil in a non-stick pan. Put chaaps into the oil and shallow fry them till golden brown in colour.
  • Remove from the pan, in the same pan, add little more oil (if required).
  • Add coarsely crushed cloves, green cardamom, cinnamon stick. Saute for 3-4 secs.
  • Add onion paste and ginger-garlic paste.
  • Bhuno till it becomes golden brown in colour.

  • Add tomatoes. Mix well and again bhuno till oil separates.
  • Now add beaten curd. (Remember add beaten curd to the dish after switching off the burner or just keep it on low flame)
  • Bhuno till masala leaves the fat.
  • Add all the dry masalas (salt, red chilly powder, cumin powder, coriander powder, garam masala, kitchen king/chicken masala).
  • Mix well and saute for 3-4 mins.
  • Now add 2 cups of water. Mix and bring it to boil.
  • Add soya chaaps and cook on low flame for 10-15 mins.

  • Remove from heat, add beaten malai or cream. Mix well.
  • Bring it back on gas burner. Cook chaaps on low flame for another 5 mins.
  • Soya chaaps are ready to serve with roti or naan.
  • Serve hot.


Don't they look like chicken pieces ???


Sending this recipe to:

  Divya's blog/ Priya's blog                                         Siri's blog
                                                          
           Ramya's Blog
    

Wednesday, 5 December 2012

Idli with Sambhar

Hello Friends ...

Back to the blogging after one week gap ......Today's recipe is my son's favourite dish Idli with Sambhar.
He can have idli in all his main course. I always keep the batter ready in my fridge, no idea when will he demand for it.
Its very easy and healthy food for kids and adults too. Idlis are served with sambhar or chutney.


Ingredients:
2 cups parboiled rice or normal rice
1 cup urad dal
Salt acc.to taste
1 tbsp oil
1/4 tsp fenugreek seeds for flavor (optional)


Method:
  1. Soak urad dal and rice with fenugreek seeds separately in water for 8-10 hrs or overnight.
  2. Grind the ingredients one by one in a mixer to make a smooth paste.
  3. Keep adding water according to the requirement.
  4. Now put both the paste in a large bowl and mix well.
  5. Add salt and mix nicely.
  6. Keep it aside for 6-7 hrs for fermentation.
  7. Grease the idli stand with little oil. 
  8. Pour the mixture into the greased idli stand.
  9. Pour 1 1/2 cups of water in the pressure cooker and then place the stand for a 10-15 minutes in a cooker without weight for steaming or in a rice cooker.
  10. To check whether idlis are cooked insert a knife in the middle of the idli, if it comes out clean then your idlis are ready to serve.
  11. Carefully take out the stand and remove the idlis using the spoon.
  12. Serve hot with Sambhar and chutney.

For Sambhar recipe, Click HERE 
For Chutney recipe, Click HERE
Note : If you add beaten rice (poha) while grinding rice, it will make your idlis   very soft.
Consistency of the batter should not be too thick or too watery.


Sending this recipe to :
            Siri's Blog                                                                          Divya's Blog / Priya's Blog